The right way to create a Flutter project
Learn the best way to set up and create your Flutter project and save time from unnecessary future edits.


It is very important to create your Flutter project correctly. It will save you a lot of time in the future by naming your project properly, as well as setting up documentation to make your project readable.
Before you start creating your project, make sure you have set up your Flutter tools on your machine. Once your machine is ready, then let's get started!
 Rafael Delos Santos
Creating the Flutter Project
When creating a Flutter project from scratch, it is important to do it correctly. While you can get away with a simple flutter create, it is much better to include not just the project name, but your organisation name.
Your organisation name will appear both in your iOS and Android sub-directory projects, so make sure you do this right and do not end up with com.example.
To do so, run the command:
flutter create my_awesome_app --org com.themobilecoder
This way, your project will be your own and you won't have to worry about renaming packages later.
Another good point that Andrew raised to minimise your project size is to define only the platforms you are going to build an app for.
flutter create my_awesome_app --org com.themobilecoder --platform=ios,androidThis command will prevent creating app dependencies on other platforms like Web, Desktop, etc.
You can also include a description field so that your pubspec.yaml would be updated. I think updating the description within the pubspec file should be enough.
Clean up your pubspec.yaml
The next thing to do is to clean up the pubspec.yaml. This file contains your project's Flutter dependency and configurations.
To help you set it up to standards, your pubspec.yaml file should look something like this. (as of June 2023):
name: my_awesome_app
description: My Awesome App is an app to make everyone awesome.
publish_to: 'none' # Remove this line if you wish to publish to pub.dev

version: 1.0.0+1
environment:
  sdk: '>=3.0.3 <4.0.0'

dependencies:
  flutter:
    sdk: flutter
  cupertino_icons: ^1.0.2

dev_dependencies:
  flutter_test:
    sdk: flutter
  flutter_lints: ^2.0.0

flutter:
  uses-material-design: true

  # To add assets to your application, add an assets section, like this:
  # assets:
  # - images/a_dot_burr.jpeg
  # - images/a_dot_ham.jpeg
Do not forget to add an app description here. This pubspec.yaml also contains commented lines of code for assets in case you want to add images or videos to your app in the future.
Clean up your README.md
Many public projects found in GitHub made by personal accounts always have the default README.md starter content.
It's best to update it now so that anyone looking at your project will see your efforts in your code.
If you need inspiration for your README.md, you can follow the template below:
# My Awesome App
My Awesome App is an app to make everyone awesome.

## Setup

Here are the steps to set up your machine to start running My Awesome App
//TODO: Add more information here
Add a LICENSE file
If you are planning to make your project public, you might want to decide which license to use. If it is going to be a private or top-secret project, then it's best to not put any license as it is by default an exclusive copyright.
For public or open-source projects, feel free to check out Github's tool to help you decide which license will fit your use case.
For simplicity's sake, use an MIT license if you want to allow other people to use, modify, and improve your project, as long as they keep this LICENSE and copyright notice.
MIT License

Copyright (c) [2023] [Rafael Delos Santos]

Permission is hereby granted, free of charge, to any person obtaining a copy
of this software and associated documentation files (the "Software"), to deal
in the Software without restriction, including without limitation the rights
to use, copy, modify, merge, publish, distribute, sublicense, and/or sell
copies of the Software, and to permit persons to whom the Software is
furnished to do so, subject to the following conditions:

The above copyright notice and this permission notice shall be included in all
copies or substantial portions of the Software.

THE SOFTWARE IS PROVIDED "AS IS", WITHOUT WARRANTY OF ANY KIND, EXPRESS OR
IMPLIED, INCLUDING BUT NOT LIMITED TO THE WARRANTIES OF MERCHANTABILITY,
FITNESS FOR A PARTICULAR PURPOSE AND NONINFRINGEMENT. IN NO EVENT SHALL THE
AUTHORS OR COPYRIGHT HOLDERS BE LIABLE FOR ANY CLAIM, DAMAGES OR OTHER
LIABILITY, WHETHER IN AN ACTION OF CONTRACT, TORT OR OTHERWISE, ARISING FROM,
OUT OF OR IN CONNECTION WITH THE SOFTWARE OR THE USE OR OTHER DEALINGS IN THE
SOFTWARE.
Add a CHANGELOG.md file
Not everyone wants to add unnecessary files in the project that do not help in making the app run. While CHANGELOG is not required, it is highly encouraged to have one in your project.
CHANGELOG can easily tell other developers (including you in the future) what has been done in each release. This file provides significant value especially when you publish your very own Flutter library in public.
You can copy this template that I use in my projects for your CHANGELOG and start adding notes every time you add new features to the new version of your app.
# Changelog

## v1.0.0
- Set up the proper project directory
- Add hello world feature
Add an app file
Your main.dart file contains all the necessary code to run your initial Flutter project. While this works, putting everything in one file is not the best practice, especially when your project gets bigger.
The first thing to do is create a separate app file to contain the MyApp. This is good practice because you can later put your navigation routing, screens, themes, and more in this file. You can also create other instances of this file for running tests, trying out themes, and other configurations.
Go to your main.dart file and cut the code that contains the MyApp class and paste it into the new file created.
I would suggest renaming the MyApp class to your own app name e.g. MyAwesomeApp using the Refactor shortcut (F2).
Rafael Delos Santos
Add a Home Page class file
You may have noticed as well in the main.dart file that it contains a MyHomePage default widget that contains the very first default screen. Let's clean this up by creating a separate file for this.
The location of this file should not matter for now, as there are many discussions as to what the right structure of files should be (feature directory vs types directory), but we can deal with that in another tutorial.
Clean up the main file
Your main.file should contain less code now after moving both the MyAwesomeApp class and the MyHomePage class to their respective files.
It is better to separate these functions and classes into their respective files as it will help you later the moment you consider having different build configs, running tests and flavour types.
Fix the Widget Test
When creating a Flutter project, it adds a widget test by default. After doing the reorganisation in the previous steps, make sure to fix the widget_test.dart found under the test directory by fixing the imports and using the correct class names in there.
Updated file output
After doing these steps and fixing the imports on each file, the different files should look something like the snippets above. All class names and imports have been updated so that it builds just fine.
New main.dart
import 'package:flutter/material.dart';
import 'package:my_awesome_app/my_awesome_app.dart';

void main() {
  runApp(const MyAwesomeApp());
}
New my_awesome_app.dart
import 'package:flutter/material.dart';
import 'package:my_awesome_app/my_home_page.dart';

class MyAwesomeApp extends StatelessWidget {
  const MyAwesomeApp({super.key});

  @override
  Widget build(BuildContext context) {
    return MaterialApp(
      title: 'My Awesome App',
      theme: ThemeData(
        colorScheme: ColorScheme.fromSeed(seedColor: Colors.deepPurple),
        useMaterial3: true,
      ),
      home: const MyHomePage(title: 'Flutter Demo Home Page'),
    );
  }
}
New my_home_page.dart
import 'package:flutter/material.dart';

class MyHomePage extends StatefulWidget {
  const MyHomePage({super.key, required this.title});
  final String title;

  @override
  State<MyHomePage> createState() => _MyHomePageState();
}

class _MyHomePageState extends State<MyHomePage> {
  int _counter = 0;

  void _incrementCounter() {
    setState(() {
      _counter++;
    });
  }

  @override
  Widget build(BuildContext context) {
    return Scaffold(
      appBar: AppBar(
        backgroundColor: Theme.of(context).colorScheme.inversePrimary,
        title: Text(widget.title),
      ),
      body: Center(
        child: Column(
          mainAxisAlignment: MainAxisAlignment.center,
          children: <Widget>[
            const Text(
              'You have pushed the button this many times:',
            ),
            Text(
              '$_counter',
              style: Theme.of(context).textTheme.headlineMedium,
            ),
          ],
        ),
      ),
      floatingActionButton: FloatingActionButton(
        onPressed: _incrementCounter,
        tooltip: 'Increment',
        child: const Icon(Icons.add),
      ),
    );
  }
}
New widget_test.dart
import 'package:flutter/material.dart';
import 'package:flutter_test/flutter_test.dart';
import 'package:my_awesome_app/my_awesome_app.dart';

void main() {
  testWidgets('Counter increments smoke test', (WidgetTester tester) async {
    // Build our app and trigger a frame.
    await tester.pumpWidget(const MyAwesomeApp());

    // Verify that our counter starts at 0.
    expect(find.text('0'), findsOneWidget);
    expect(find.text('1'), findsNothing);

    // Tap the '+' icon and trigger a frame.
    await tester.tap(find.byIcon(Icons.add));
    await tester.pump();

    // Verify that our counter has incremented.
    expect(find.text('0'), findsNothing);
    expect(find.text('1'), findsOneWidget);
  });
}
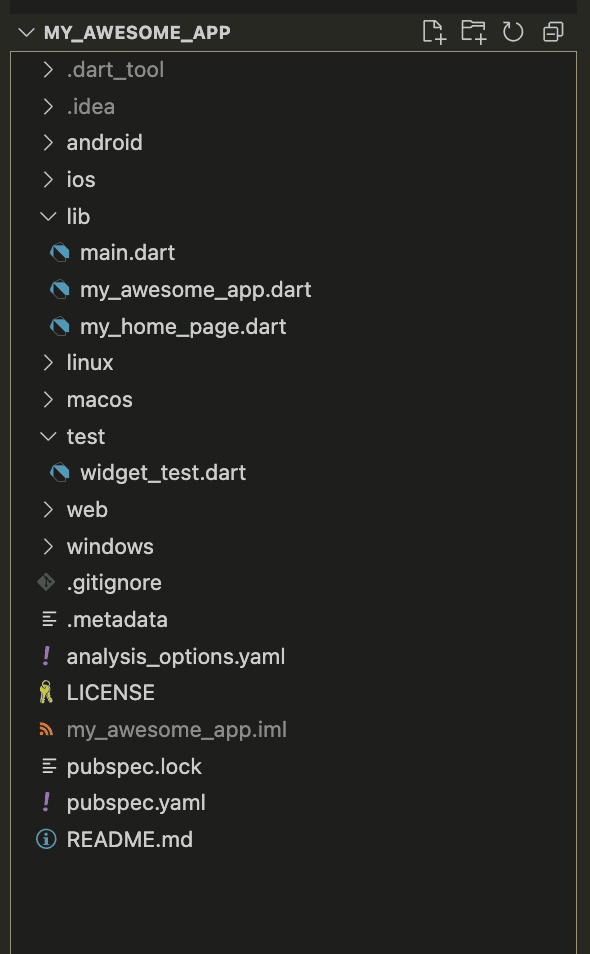
File Directory
Once everything has been updated, your Flutter project directory should look something like this. We can discuss in another tutorial how and when to use different file directory structures, but for now, this would suffice.
Summary
In summary, following the steps in this tutorial is one of the better ways to start a Flutter project. While this looks like more work and setting up than just running the default set-up made by Flutter, this approach has saved me lots of time in terms of documentation and implementing new features.